It has been two whole years since I taught all of the elementary grades. This year, one of my goals is to teach a topic across the grade levels- scope and sequence here I come!
K/1 paper symmetry designs


The kindergarten and first graders looked at examples of symmetry patterns in quilts. We did a lot of practice together first- creating symmetry with wooden shapes on the carpet and drawing collaboratively on the white board. I had the students fold their squares into four sections- whatever paper shapes they put into one section, had to be repeated in the other sections. Some of the students understood to mirror the design along lines of symmetry, others did not quite get the concept. The first graders finished sooner and had time to add extra detail with line overtop of their paper designs.
2/3 pastel symmetry resist and colour wheel
I had them draw a pattern using shape and line in three sections of a circle diagram. We then folded the circle so the pattern was on the inside. At the windows, I demonstrated tracing overtop of the lines (with pencil) to create a transfer of the same pattern onto the remaining three sections *insert gasps of awe and wonder. The next lesson we discussed primary and secondary colours, mixing and painting them into the sections of the circle. The pastel design underneath created a resist and mostly showed through tempera paint. The final step was cutting out the painted circles, mounting them on black paper and using pastel to create a line design around the edges to frame the finished pieces.
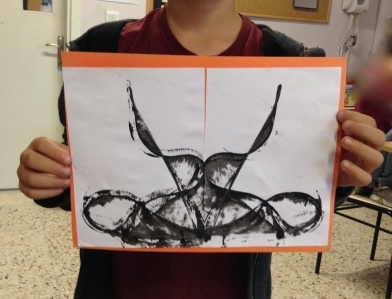 String Painting
A bonus activity I tried with 2nd grade. While chaotic and messy, it was worth it to see their reactions when the papers came apart to reveal each print… and to hear that they were talking about it long after the class!
and a second project…
2/3 3D radial sculptures


I did this project a couple years ago with 6th grade. I decided to try it with a younger age group since the kiddos are always asking for paper to make folded creations. I taught them a few basic folds to get them started, and we folded the background squares to create lines of symmetry. Any shape added to the design had to be repeated in adjacent sections Some of them got the concept of radial symmetry, I was content to let others make two halves of the design that mirrored.
4/5 radial name design and colour schemes


Previously, in high school, I have done a similar project with colour schemes and the students each come up with their own designs. For this version, students practiced writing their names in many styles before choosing one to draw and transfer to each section of their tile to create a radial design. We then spent several classes learning about and practicing colour schemes, including: primary, secondary, warm, cool, monochromatic and complementary. Each section of the tile is painted using a different colour scheme- 6 in total with two repeats (though some students were eager to learn new schemes- neutral and tertiary). These ones are taking us a while, here are the finished ones so far!
